

Learn how to sew a Christmas tree drawstring pouch with a lining, festive fabric trees, and a two-cord closure.

Bring a smile to your loved ones’ faces with a handmade Christmas drawstring pouch! Moreover, you can fill it with personalized gifts or Christmas treats. Here’s a complete step-by-step tutorial for you to get started.
Materials Needed to Begin With
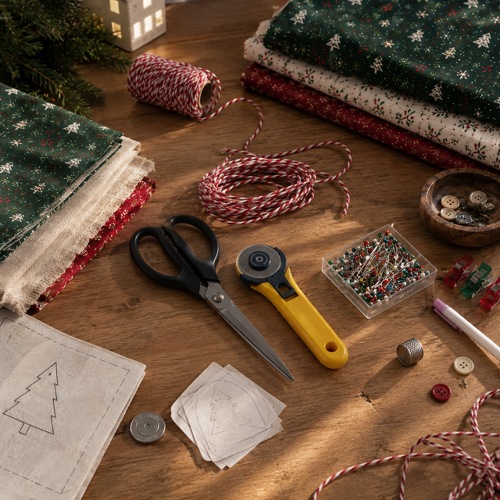
Fabric and Interfacing
- Outer pouch fabric
- Lining fabric
- Two narrow fabric strips for the drawstring casing
- Fabric for the two Christmas tree shapes
- Thin fusible interfacing
- Decorative ribbon, approximately 30 cm
Sewing and Cutting Tools
- Sewing machine and coordinating thread
- Fabric scissors or rotary cutter
- Ruler and cutting mat
- Fabric marking pen or erasable pencil
- Iron and ironing board
- Pins or fabric clips
- Paper for Christmas tree template
- Small coin for drawing rounded template corners
Finishing Supplies
- Two cords, each 50 cm long
- Two cord ends or cord stoppers/finishing tips
- Safety pin or cord threader
- Fabric glue or hot glue gun (for embellishments)
- Pinking shears (for ribbon and fabric edges)
Christmas Tree Drawstring Pouch Steps
Step 1: Prepare the Fabric and Interfacing
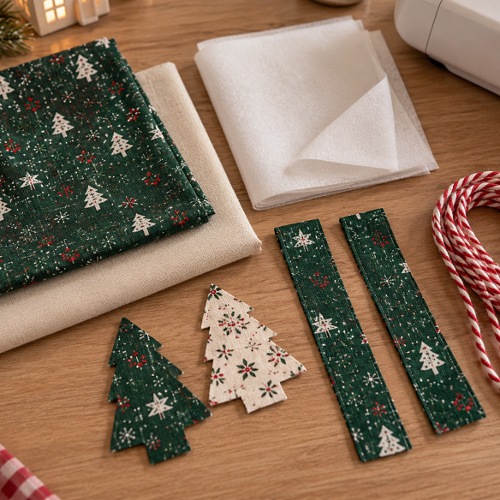
Pick two coordinating fabrics like red and green for the pouch exterior and lining.
Cut the outer fabric and lining to 34 × 18 cm. Cut two narrow strips measuring 4 × 18 cm each. Prepare the fabric and interfacing for the two tree details according to these measurements.
Now, fuse the thin interfacing to the tree fabric, following the temperature and pressing instructions. It will help the tree details hold their shape.
Beginner’s Tip: Press the fabric before cutting and keep each group of pieces together to avoid mixing up the exterior, lining, and tree fabrics.
Step 2: Make the Drawstring Casing Strips
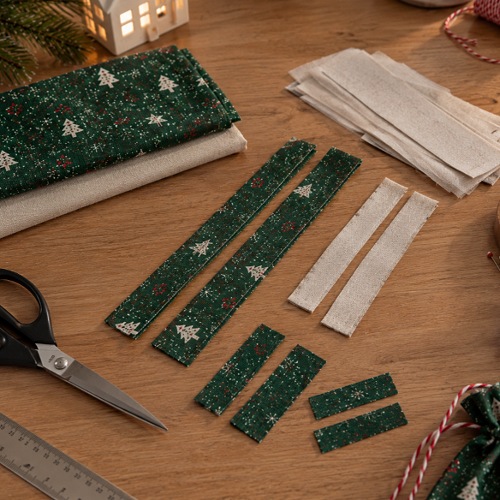
The two narrow strips will form the channels through which the cords pass. Take one 4 × 18 cm strip and mark a line 2 cm from each long edge. Fold each edge inward along the marked line and press.
Open the folds and mark a line 1 cm from each long edge. Fold each long edge inward along the new 1 cm lines and press.
Fold the strip again along the original creases to enclose the raw edges. Stitch close to the folded edges to secure the strip.
Repeat the process for the second strip. The finished strips should have neat, enclosed edges and be ready to attach to the pouch.
Step 3: Attach the Casing Strips to the Exterior
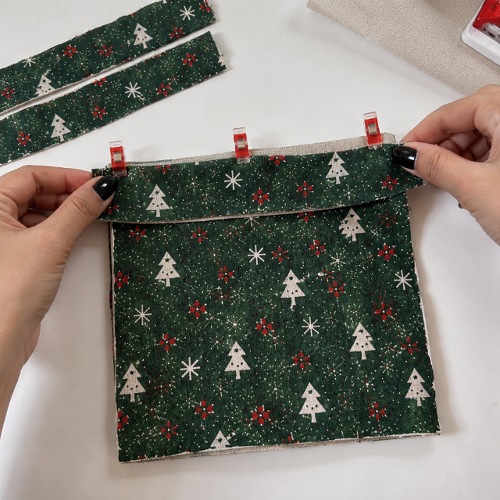
Now, take the 34 × 18 cm outer fabric and mark a horizontal line 3 cm from each short end. Locate the centre of each narrow casing strip and align it with the centre of the corresponding marked line.
Pin or clip each strip in position. Stitch close to the edges of the casing strips to attach them to the exterior fabric. Press the piece flat once both strips are secured!
Why this step matters: The casing strips form the channels needed for the drawstrings, so accurate positioning helps the pouch close evenly.
Step 4: Shape the Bottom Corners of the Pouch
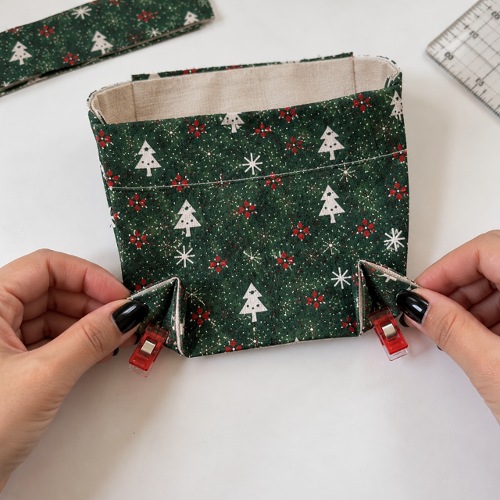
Next, fold the outer fabric in half, aligning the edges carefully. At the bottom corners, mark a rectangle measuring 4 cm across and 3 cm high.
Cut away the marked corner sections. Repeat the same process with the lining fabric, making sure the cut-outs match. These cut-outs will allow you to form a flat base when the pouch is assembled.
Step 5: Make the Christmas Tree Template
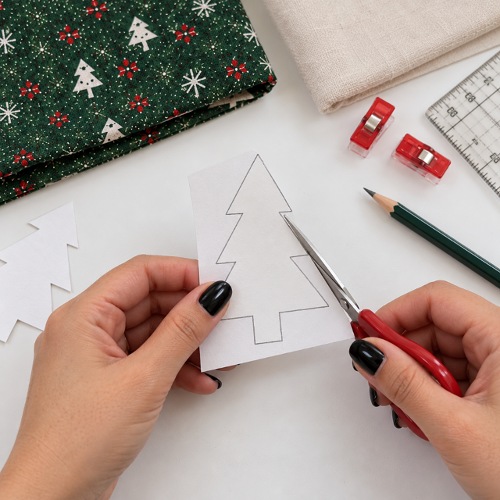
Use a paper template for the tree shape. Join paper sheets if necessary to create a piece measuring 42 × 14 cm. Fold the paper in half lengthwise and mark the centre fold.
Now, use the ruler to mark the horizontal guide lines at the intervals. Mark the centre line and the reference points to draw the stepped tree shape.
Use a small coin to draw the rounded corners. Join the marked points with straight lines to complete the tree outline. Cut out the tree shape and the centre opening.
Step 6: Trace and Sew the Christmas Tree Shapes
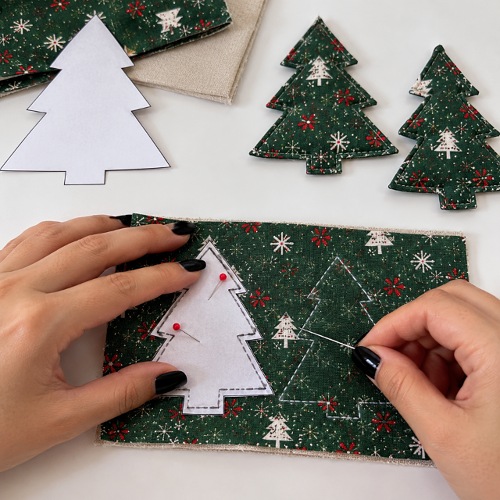
Place the tree fabric layers right sides together, aligning their edges. Position the paper template and trace the tree outline onto the fabric. Pin or clip the layers together so they do not shift while sewing.
Stitch along the traced tree outline, following the curves and corners carefully. Leave the designated opening unstitched so the fabric can be turned right side out.
At corners, stop with the needle down, lift the presser foot and pivot the fabric. Sew slowly around the rounded sections to keep the outline smooth!
Step 7: Trim, Turn and Press the Trees
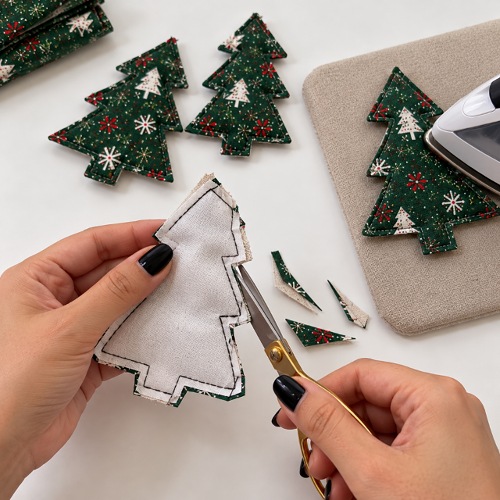
Remove the template and trim the excess fabric around the stitched outline, leaving enough fabric to protect the seam. At tight curves and corners, carefully clip or trim the excess fabric without cutting into the stitching.
Leave the seam allowance at the opening so it can be tucked inside neatly. Turn each tree right side out through the opening. Use a blunt-ended tool to push out the rounded corners, then press the tree flat. Repeat the process for the second tree.
Beginner’s Tip: Avoid pulling the fabric aggressively when turning small shapes. Slow, gentle movements help prevent the stitches from breaking.
Step 8: Attach the Trees
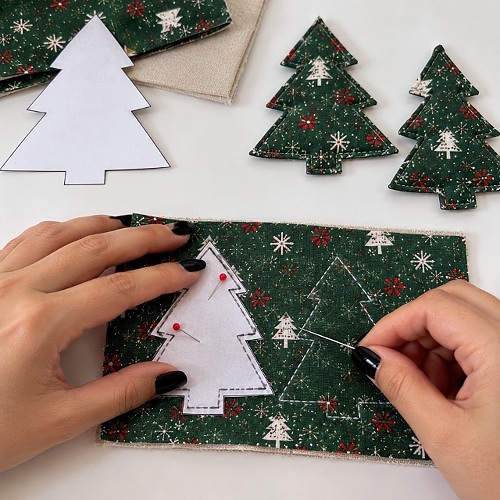
Now, position the two tree details on the outer fabric, aligning their center marks and ensuring they face the direction you want.
Pin them in place and stitch close to the existing seam to secure the tree fabric to the pouch exterior.
Press the fabric to remove the marking lines, checking that the trees are positioned symmetrically.
Step 9: Sew the Outer Pouch
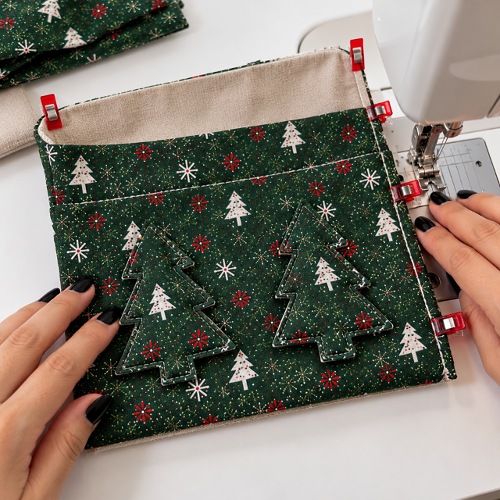
Fold the outer pouch fabric in half with the right sides together. Align the edges and clip the sides. Sew down each side using a 5 mm seam allowance, taking care not to catch the tree details incorrectly.
To form the flat base, open each bottom corner and align the side seam with the bottom seam. Clip the layers together and stitch across each corner, again using a 5 mm seam allowance. This forms the box-shaped bottom of the pouch.
Step 10: Sew the Lining
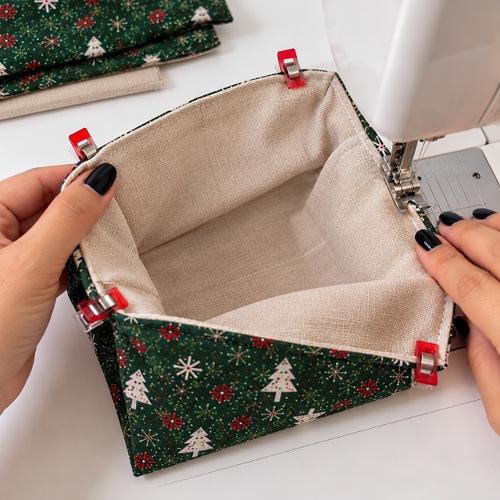
Fold the lining fabric in half with the right sides together. Stitch one side completely. On the other side, leave an opening approximately 8–9 cm long for turning the pouch later.
Sew the bottom corners using the same method as the outer pouch, aligning the seams carefully. Do not close the turning opening yet!
Step 11: Join the Lining
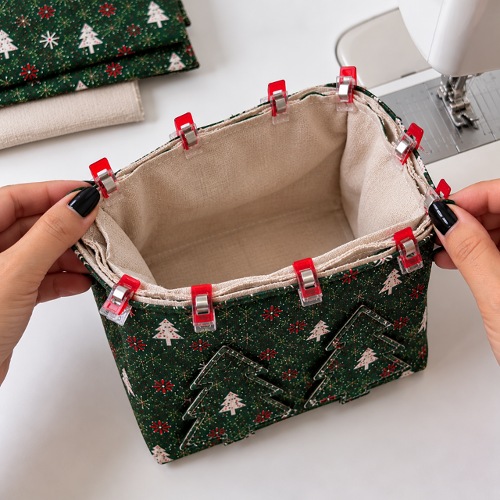
Turn the outer pouch right side out, keeping the lining inside out. Place the outer pouch inside the lining so the right sides face each other. Align the side seams and clip around the top edge.
Sew around the top using a 1 cm seam allowance. Pull the outer pouch through the opening in the lining to turn the entire project right side out. Gently push out the corners and arrange the lining neatly inside.
Step 12: Close the Lining
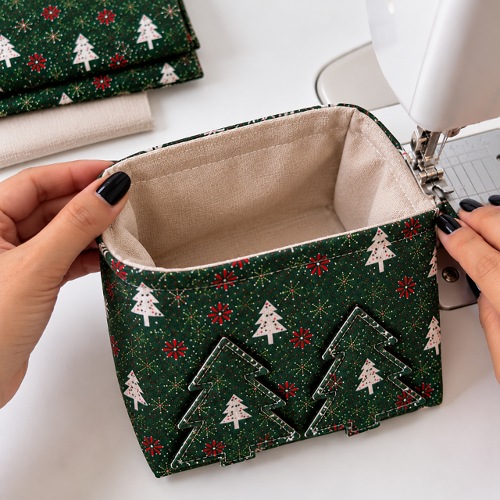
Fold the raw edges of the lining opening inward and pin them together. Stitch close to the edge to close the opening. Push the lining inside the pouch and align the top edges.
Clip the layers in place, then topstitch around the top approximately 5 mm from the edge, using a longer stitch length of around 3.5 mm. Press the pouch carefully to give it a neat finish.
Step 13: Secure the Christmas Trees Upright
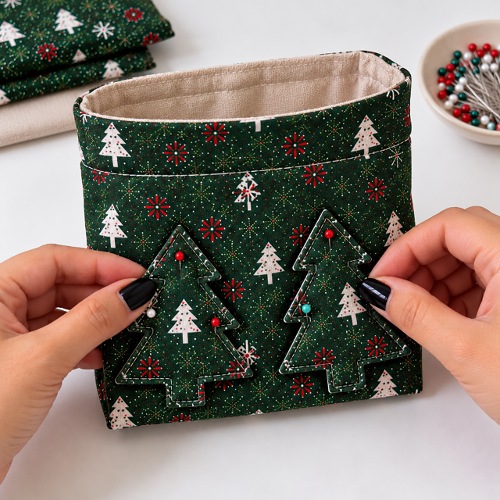
Position each tree so it hangs straight and stands neatly against the pouch. Use clips to hold the trees in the desired position.
Make a small securing stitch through the tree and the pouch approximately 1 cm below the tree’s lower fabric edge.
Repeat on the other side. These small stitches help prevent the tree details from flopping outward or becoming misaligned.
Step 14: Insert the Drawstrings
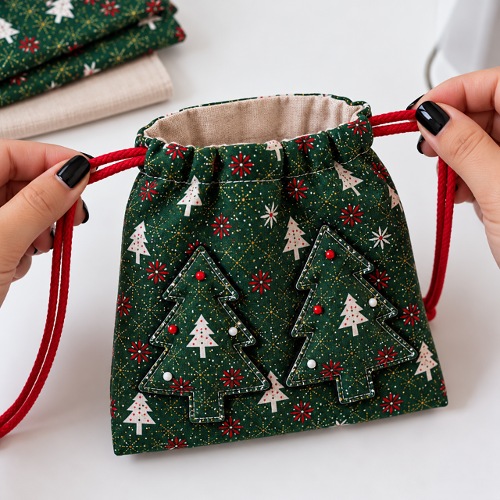
Take the first 50 cm cord and thread it through the casing so that it travels around the pouch and returns to the same side where it entered. Thread the second cord in the opposite direction, so its ends emerge on the opposite side.
The result should be a two-cord closure: pulling the cords gathers the pouch evenly from both sides. To finish the ends, temporarily wrap tape around each cord end to help guide it through the cord finishing tip.
Tie a knot, remove the tape, and trim any excess cord as needed. Check that both cords slide smoothly and that the pouch opens and closes without snagging.
Step 15: Add the Decorative Ribbon Bows

This is an optional finishing step. Wrap the ribbon around your fingers to form two or three loops, then secure the centre with a knot.
Adjust the loops until the bow looks balanced. Trim the ribbon ends with pinking shears if needed.
Attach the bow over the visible seam using a small amount of hot glue or a few hand stitches. Repeat on the other side if you want matching bows.
Your Christmas tree drawstring pouch is now complete!
Tips for Sewing a Neat Drawstring Gift Bag
If your tree shapes look uneven, trace carefully and sew along the marked outline. To get rid of angular curves, you must sew slowly and pivot your fabric in small increments!
Trim excess seam allowance before turning so that your fabric doesn’t bunch at the corners. If your pouch’s base doesn’t sit flat, then you must match the side and bottom seams before stitching the corner triangles.
Note: Your casing folds should be even, and no stitches should obstruct the channel so that your drawstrings don’t get stuck!
Align the centre marks and secure the triangle with a small stitch if your triangles lean to one side. If your lining pulls out of the pouch, then press the top edge and topstitch securely through both layers.
Making these adorable gift bags is indeed simple! How about trying your hands at ten-minute fall sewing patterns as your next DIY project?